Spreadsheets are quite powerful tools. They can also act as a simple database with an intuitive UI. You can use the spreadsheet as a temporary database and GSheets API as a CRUD API while you prototype your own application. This article will teach you how to manage Google Sheets using your C# application.
Prepare your spreadsheet
The sample application will be a simple shopping list manager console application. It will insert/update/delete items in the shopping list and keep a log of each event in another sheet.
While logged in to your Google account, open your Google Drive.
Click the New button on the top left, then click Google Sheets in the menu.

Name your spreadsheet Shopping List.
At the bottom of the screen, right-click on the sheet name (Sheet1) and rename it to Cart.
Set the value of A1 to Item and B1 to Quantity. You can style the cells the way you like.

Now that the “database” is ready, move on to the next section to set up the permissions.
Generate Credentials
Go to Google API Console.
Click APIs & Services and Library

Search sheets and click Google Sheets API in the search results.
In the API settings, click the Enable button.

Click the Create Credentials button.

In the credential type, select Application Data.

It will ask if you’re planning to use it with Kubernetes etc. Select “No, I’m not using them”.

Click Next.
In the service account settings, enter shopping-list-service-account as the service account name and click Create and Continue.

Click Continue to proceed.

Click Done to finish the account creation.

Click Credentials and the new service account.

Click Keys and Add Key.

Click Create new key, keep JSON as the selected option and click Create.

A download should automatically start with your credentials. You will need this file later on.
Finally, you need to share your spreadsheet with the new service account. Go to your sheet and click the Share button.
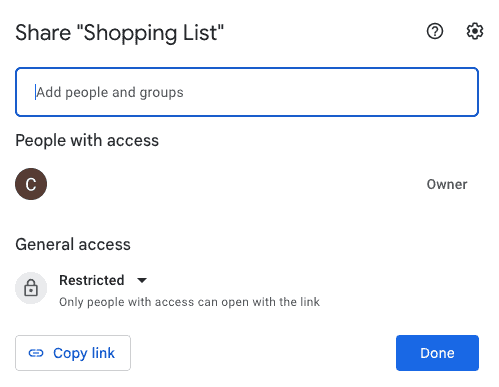
Copy the email address generated for your service account and paste it into the Add people and groups textbox.

Click the Share button and close the dialog.
Now you can proceed to create the application.
Implement the sample application
In a terminal, navigate to the root directory that you want to create the project in and run:
dotnet new console --name ShoppingList --output .
Add the necessary Google Sheets SDK, via NuGet:
dotnet add package Google.Apis.Sheets.v4
Copy the downloaded credentials to the project folder and open the project with your IDE.
To access your spreadsheet fro myour program, you will need the id of the sheet which you can find in the URL:

First things first: Confirm your access to your spreadsheet. To achieve that, replace the code in Program.cs with the following code:
using Google.Apis.Auth.OAuth2;
using Google.Apis.Services;
using Google.Apis.Sheets.v4;

var spreadsheetId = "{ YOUR SPREADSHEET'S ID }";
var range = "Cart!A1:B";

GoogleCredential credential;
using (var stream = new FileStream("credentials.json", FileMode.Open, FileAccess.Read))
{
    credential = GoogleCredential.FromStream(stream).CreateScoped(new string[] { SheetsService.Scope.Spreadsheets });
}

var sheetsService = new SheetsService(new BaseClientService.Initializer()
{
    HttpClientInitializer = credential,
    ApplicationName = "ShoppingList"
});

SpreadsheetsResource.ValuesResource.GetRequest getRequest = sheetsService.Spreadsheets.Values.Get(spreadsheetId, range);

var getResponse = await getRequest.ExecuteAsync();
IList<IList<Object>> values = getResponse.Values;
if (values != null && values.Count > 0)
{
    foreach (var row in values)
    {
        Console.WriteLine(row[0]);
        Console.WriteLine(row[1]);
    }
}
Replace { YOUR SPREADSHEET'S ID } with the actual value and run the application. The column titles (Item and Quantity) should be displayed in your terminal.
You can add some items to your shopping list and test again.

Before going further, refactor the code. You will encapsulate all GSheets-related functions in a called GSheetsHelper.cs. Create the file and update the code as below:
using Google.Apis.Auth.OAuth2;
using Google.Apis.Services;
using Google.Apis.Sheets.v4;

namespace ShoppingList;

public class GSheetsHelper
{
    private SheetsService _sheetsService;
    private string _spreadsheetId = "{ YOUR SPREADSHEET'S ID }";
    private string _range = "Cart!A2:B";

    public GSheetsHelper()
    {
        GoogleCredential credential;
        using (var stream = new FileStream("credentials.json", FileMode.Open, FileAccess.Read))
        {
            credential = GoogleCredential.FromStream(stream).CreateScoped(SheetsService.Scope.Spreadsheets);
        }

        _sheetsService = new SheetsService(new BaseClientService.Initializer()
        {
            HttpClientInitializer = credential,
            ApplicationName = "ShoppingList"
        });
    }

    public async Task PrintCartItems()
    {
        SpreadsheetsResource.ValuesResource.GetRequest getRequest = _sheetsService.Spreadsheets.Values.Get(_spreadsheetId, _range);

        var getResponse = await getRequest.ExecuteAsync();
        IList<IList<Object>> values = getResponse.Values;
        if (values != null && values.Count > 0)
        {
            Console.WriteLine("Item\t\t\tQuantity");

            foreach (var row in values)
            {
                Console.WriteLine($"{row[0]}\t\t\t{row[1]}");
            }
        }
    }
}
Run the application now and you should see your items in your cart printed in your terminal:

Convert the application to a CLI
You now have the functionality to get your cart, but it will do the same thing every time. To add more commands, convert your application into a CLI. First, add the System.CommandLine package to your project:
dotnet add package System.CommandLine --version 2.0.0-beta4.22272.1
Create your first command, the same functionality as above, to print the cart items. Replace Program.cs with the following code:
using System.CommandLine;
using ShoppingList;

var rootCommand = new RootCommand("Manage your shopping cart");

var printCartCommand = new Command("print", "Print the items in the cart");
printCartCommand.SetHandler(async () =>
{
    var gsheetsHelper = new GSheetsHelper();
    try
    {
        await gsheetsHelper.PrintCartItems();
    }
    catch (Exception e)
    {
        Console.Error.WriteLine(e.Message);
    }
});
rootCommand.AddCommand(printCartCommand);

return rootCommand.InvokeAsync(args).Result;
Run the application with dotnet run command and you should now see an info message explaining the supported commands:

You now have to specify the command name to print the items. Run it as dotnet run print to pass the command name and you should see the contents of your cart again.
Add Items yo your Cart
The program can now be enhanced simply by adding more commands.
Add the following function to GSheetsHelper.cs:
public async Task AddItem(string itemName, decimal quantity)
{
    var valuesToInsert = new List<object>
    {
        itemName,
        quantity
    };

    SpreadsheetsResource.ValuesResource.AppendRequest.ValueInputOptionEnum valueInputOption = SpreadsheetsResource.ValuesResource.AppendRequest.ValueInputOptionEnum.RAW;
    SpreadsheetsResource.ValuesResource.AppendRequest.InsertDataOptionEnum insertDataOption = SpreadsheetsResource.ValuesResource.AppendRequest.InsertDataOptionEnum.INSERTROWS;

    var requestBody = new ValueRange();
    requestBody.Values = new List<IList<object>>();
    requestBody.Values.Add(valuesToInsert);

    SpreadsheetsResource.ValuesResource.AppendRequest appendRequest = _sheetsService.Spreadsheets.Values.Append(requestBody, _spreadsheetId, _range);
    appendRequest.ValueInputOption = valueInputOption;
    appendRequest.InsertDataOption = insertDataOption;

    await appendRequest.ExecuteAsync();
}
To invoke this method, add the command to Program.cs:
var itemNameOption = new Option<string>(
    new[] {"--item-name", "-n"},
    description: "The name of the item"
);
itemNameOption.IsRequired = true;

var quantityOption = new Option<decimal>(
    new[] {"--quantity", "-q"},
    description: "The quantity of the item"
);
quantityOption.IsRequired = true;

var addItemCommand = new Command("add", "Add an item to the cart")
{
    itemNameOption,
    quantityOption
};
addItemCommand.SetHandler(async (itemName, quantity) =>
{
    var gsheetsHelper = new GSheetsHelper();
    try
    {
        await gsheetsHelper.AddItem(itemName, quantity);
    }
    catch (Exception e)
    {
        Console.Error.WriteLine(e.Message);
    }
}, itemNameOption, quantityOption);
rootCommand.AddCommand(addItemCommand);
Run the command with some item like this:
dotnet run add --item-name Steaks --quantity 2
You should see the new item in your cart:

Remove Items From Your Cart
To have remove functionality, add the following method to GSheetsHelper:
public async Task RemoveItem(string itemName)
{
    SpreadsheetsResource.ValuesResource.GetRequest getRequest = _sheetsService.Spreadsheets.Values.Get(_spreadsheetId, _range);

    var getResponse = await getRequest.ExecuteAsync();
    IList<IList<Object>> values = getResponse.Values;
    if (values != null && values.Count > 0)
    {
        for (int i = 0; i < values.Count; i++)
        {
            if (values[i][0].ToString() == itemName)
            {
                var request = new Request
                {
                    DeleteDimension = new DeleteDimensionRequest
                    {
                        Range = new DimensionRange
                        {
                            SheetId = 0,
                            Dimension = "ROWS",
                            StartIndex = i + 1,
                            EndIndex = i + 2
                        }
                    }
                };

                var deleteRequest = new BatchUpdateSpreadsheetRequest {Requests = new List<Request> {request}};
                var batchUpdateRequest = new SpreadsheetsResource.BatchUpdateRequest(_sheetsService, deleteRequest, _spreadsheetId);
                await batchUpdateRequest.ExecuteAsync();
            }
        }
    }
}
Similar to add command, define it in Program.cs by adding the following code block:
var removeItemCommand = new Command("remove", "Remove an item from the cart")
{
    itemNameOption
};
removeItemCommand.SetHandler(async (itemName) =>
{
    var gsheetsHelper = new GSheetsHelper();
    try
    {
        await gsheetsHelper.RemoveItem(itemName);
    }
    catch (Exception e)
    {
        Console.Error.WriteLine(e.Message);
    }
}, itemNameOption);
rootCommand.AddCommand(removeItemCommand);
Run the application as dotnet run remove -n Milk, and you should see the item removed from your cart.
Conclusion
This article covered the basics of setting up a new Google Sheets spreadsheet, creating API credentials and granting access to the sheet. It also showed how to develop a basic CLI to list, add and remove items from the spreadsheet. You can get the final version of the application from my GitHub repo.
Even though it’s a simple project, I hope it helped you learn the basics of managing a Google Sheets spreadsheet.


